 Paths & Paws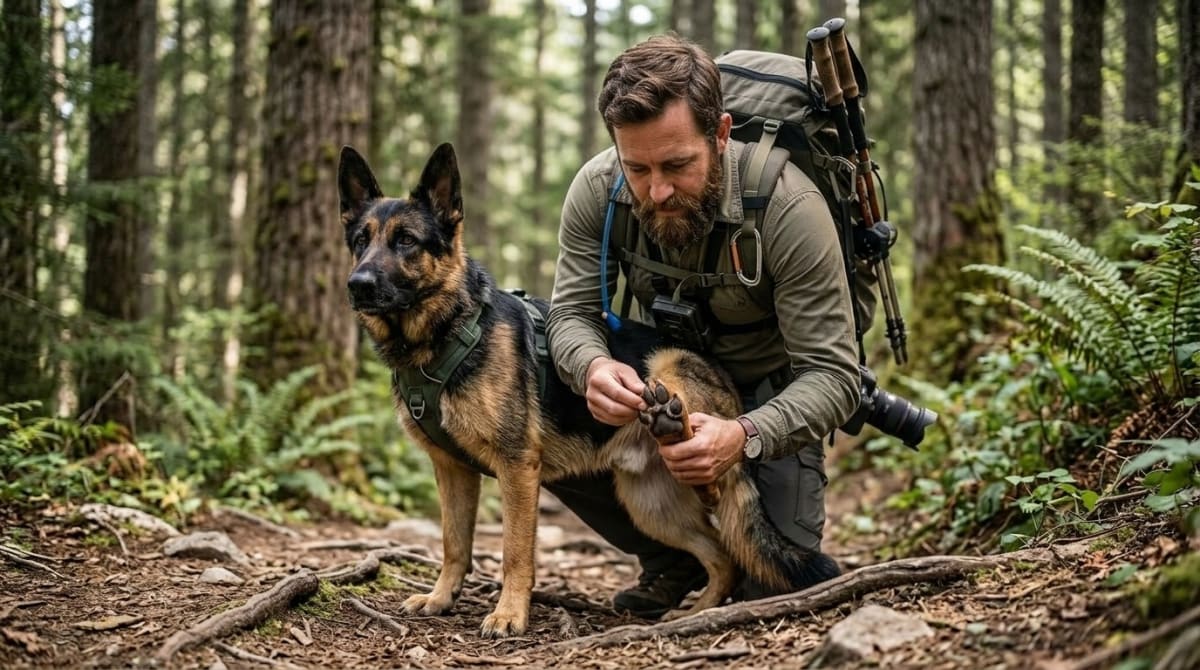
Inspect those paws right after every hike. Don't wait. The wheelbarrow check means lifting the rear legs to inspect the hind pads before moving to the front feet individually, taking maybe two minutes at most to catch micro-abrasions and hidden debris before they brew into an infection.
We learned this the hard way tracking pad wear on Jasper, our 95-pound German Shepherd. We logged trail conditions and paw pad integrity over 200 miles in the Cascades, mapping exactly how different dirt and rock surfaces slowly strip away the tough outer keratin layer covering the foot. Pad lacerations happen all the time on rocky routes. A 2020 study in the Journal of the American Veterinary Medical Association tracked working dogs on rough terrain and found 43 percent of them sustained paw pad wounds and abrasions from hidden glass or metal. Finding this stuff requires a very close look.
Key Takeaways
- 1The wheelbarrow check takes about two minutes and catches micro-abrasions before they turn into infections miles from the trailhead
- 2Heavy dogs need a modified single-leg lift instead of the traditional two-leg wheelbarrow lift to stay balanced and calm
- 3Foxtails and thorns cause the most dangerous trail injuries because they migrate under the skin if left untreated
- 4Check paws at the trailhead, halfway point, summit, and back at the car, not just when the dog starts limping
The Biology of Trail Damage
Dogs don't wear boots. Their natural pads take the full brunt of every single step. A paw pad breaks down into three anatomical layers. The outer stratum corneum is a thick protective layer of keratinized epithelium defending the foot against constant friction. The middle layer holds fat and elastic connective tissue for shock absorption, while the inner layer hides a complex network of blood vessels and sensitive nerve endings.
Friction just slowly sands down that outer black keratin layer on a long hike. Granite accelerates this. The pad turns pink. That color change exposes delicate inner tissue to direct impact. This gradual wear usually stays hidden until the dog actually starts limping, and that almost always happens miles away from the trailhead right when those nerve endings finally register the continuous friction of the rough trail surface.
Tools for the Trail
- Bright headlamp
- Slant-tip tweezers
- Travel bottle of saline flush
- At least two tough trail booties
- Self-adhering bandage wrap
- Sterile gauze pads
All of these supplies cram easily into a single compact dry bag, providing everything required to handle a sudden surface injury and get a bleeding dog off the mountain safely.
The Wheelbarrow Check Step by Step
Step 1. Position Your Dog
Start with the dog standing on a flat surface. Jasper weighs 95 pounds. He carries a ton of mass that gets hard to stabilize on uneven ground, so we actively look for a smooth patch of dirt or a wide flat rock. A tired dog always tries to sit down during an inspection. Keep them standing on all four legs.
Step 2. The Rear Lift
Stand behind the dog facing the same direction. Reach down. Gently hold both hind legs just above the hock joint and lift the rear feet a few inches off the dirt. The dog will naturally shift body weight forward onto the front legs to find balance. This angle gives a perfectly clear view of both rear paw pads at the exact same time, making it easy to compare the left and right sides to spot uneven wear. Embedded thorns or asymmetric pad degradation become obvious before setting the dog back down. This is the traditional wheelbarrow check. It works great for dogs under 50 pounds because lighter breeds usually adapt to the weight shift without totally panicking.
Step 3. Adapting for Heavy Dogs
We had to modify the wheelbarrow check for Jasper. He's massive. Lifting both his rear legs makes him dangerously unstable. Instead we lift one hind leg at a time by bending the hock backward, totally mimicking how a farrier checks a horse hoof to keep the animal securely grounded and calm during a detailed physical inspection. We thoroughly check the entire left rear pad before setting it down and picking up the right. This single-leg approach keeps a heavy dog balanced on steep trail grades. They don't stumble over loose rocks while digging around looking for cuts.
Step 4. Spread the Webbing
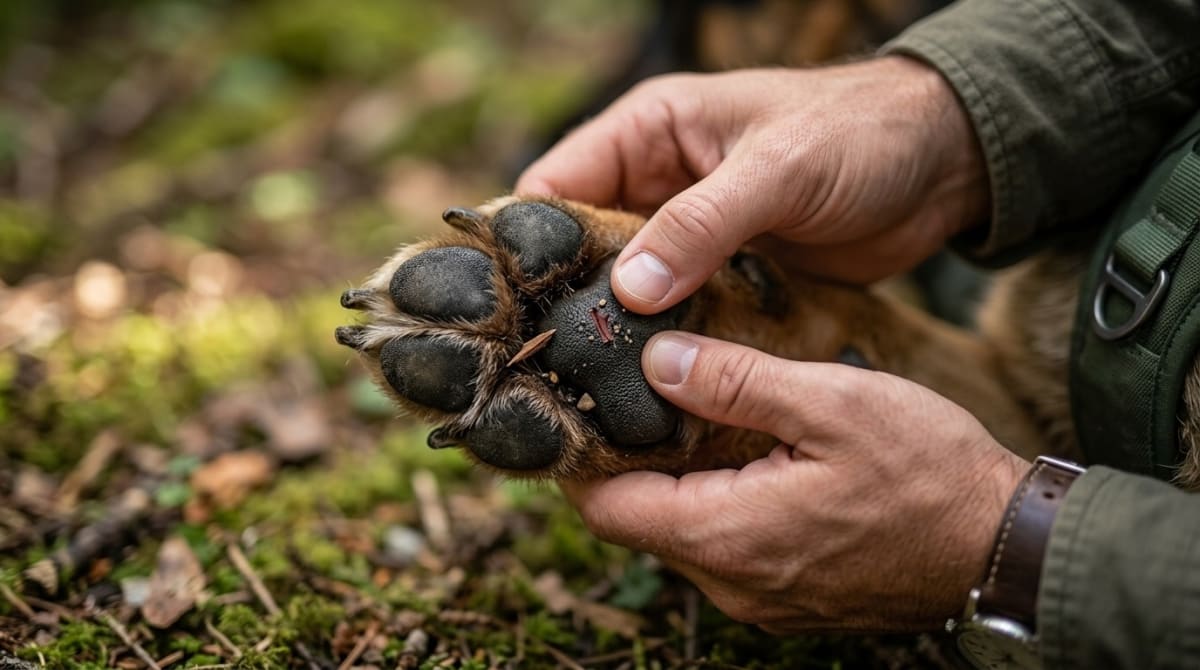
Don't just scan the main pads. Most nasty debris hides far back in the webbing between the toes. Press a thumb gently into the center of the main pad. The toes naturally spread apart. Shine that headlamp right into the gaps. Look closely for sneaky foxtails, jagged pebbles, dried mud clumps, or broken glass that trigger nasty friction blisters.
Step 5. The Front Inspection
Move up to the front. Pick up one front paw and bend the wrist backward. Check the large metacarpal pad and all four digital pads. Don't skip the upper carpal pad located higher up the back of the leg. That specific spot often gets sliced wide open when dogs scramble over splintered logs or slide down steep rocky inclines.
Identifying Trail Paw Injuries
Abrasions
Abrasions kick in when rough terrain grinds the pad like sandpaper. The black layer of keratin peels away to expose the pink tissue underneath. This damage usually happens slowly over several miles. Jasper developed painful abrasions during a brutal 15-mile hike on volcanic rock in Oregon simply because we failed to check his paws at the halfway point. Rest and a protective bootie fix the problem.
Lacerations
Cuts happen in a split second. A sharp piece of shale or broken bottle will slice right through that dense keratin layer. Stop the bleeding first. Apply direct pressure with a sterile gauze pad and hold it there for ten full minutes without peeking at the wound. Blood vessels in the paw take a long time to clot under pressure, and lifting the bandage prematurely just tears the fragile new clot while restarting the bleeding process all over again. Glass and shale hide everywhere under normal trail dirt. Watch out.
Foreign Objects and Debris
Thorns embed themselves deep. Foxtails present the absolute highest risk on western trails. These barbed grass seeds literally burrow through the skin and migrate inward, traveling up the leg and causing severe internal damage if left untreated by a veterinarian. Pull foxtails right away. Never leave any foreign object stuck in the paw. We pull at least one tiny cactus spine or goathead thorn out of Jasper's paws every single summer. The wheelbarrow check catches these tiny invaders before they brew into a massive abscess. Just flush the puncture hole with saline after yanking the object out, then apply a bootie to keep dirt out of the open wound while walking back to the car.
Making the Call on the Trail
Pad condition dictates whether to finish the hike or bail out. Light abrasions allow the hike to continue if that affected foot gets a bootie right away. Stop hiking immediately if the pad shows raw tissue that actively bleeds. Deep lacerations demand immediate intervention on the side of the trail. Wrap the foot in sterile gauze and apply a self-adhering bandage, making sure to secure it tightly above the joint so it doesn't slip off. Walk the dog back to the trailhead at a very slow pace. A dog totally refusing to put weight on an injured foot will need to be carried, which is exactly why we train Jasper to accept being hauled in a rescue sling during our neighborhood walks before ever taking him into the backcountry. Dragging a 95-pound dog three miles down a mountain is physically impossible. You need a plan.
Common Paw Inspection Mistakes
Don't skip that mid-hike inspection. Most hikers just wait until the dog visibly limps. Damage is already well advanced by the time a quiet dog actually shows pain. We inspect paws at the trailhead, at the halfway point, at the summit, and back at the car. Waiting around for obvious signs of distress means that narrow window completely closes where throwing on a simple trail bootie could have prevented a multi-week recovery process requiring strict rest and expensive veterinary care.
Many people screw up by cleaning a torn pad with rubbing alcohol. Alcohol destroys healthy cells. It causes blinding pain. Always use saline or fresh drinking water to wash a trail wound.
Don't forget the nails. A cracked nail hurts badly. Inspect every single claw during the wheelbarrow check, taking extra care to examine the base where the hard keratin meets the quick to look for hairline fractures. A split nail easily catches on exposed roots and tears further up the toe.
Frequently Asked Questions
Filed under
Kelly brings an engineering mindset to dog hiking gear. After thousands of miles with Jasper testing every harness, pack, and boot on the market, he knows what holds up and what fails.