 Paths & Paws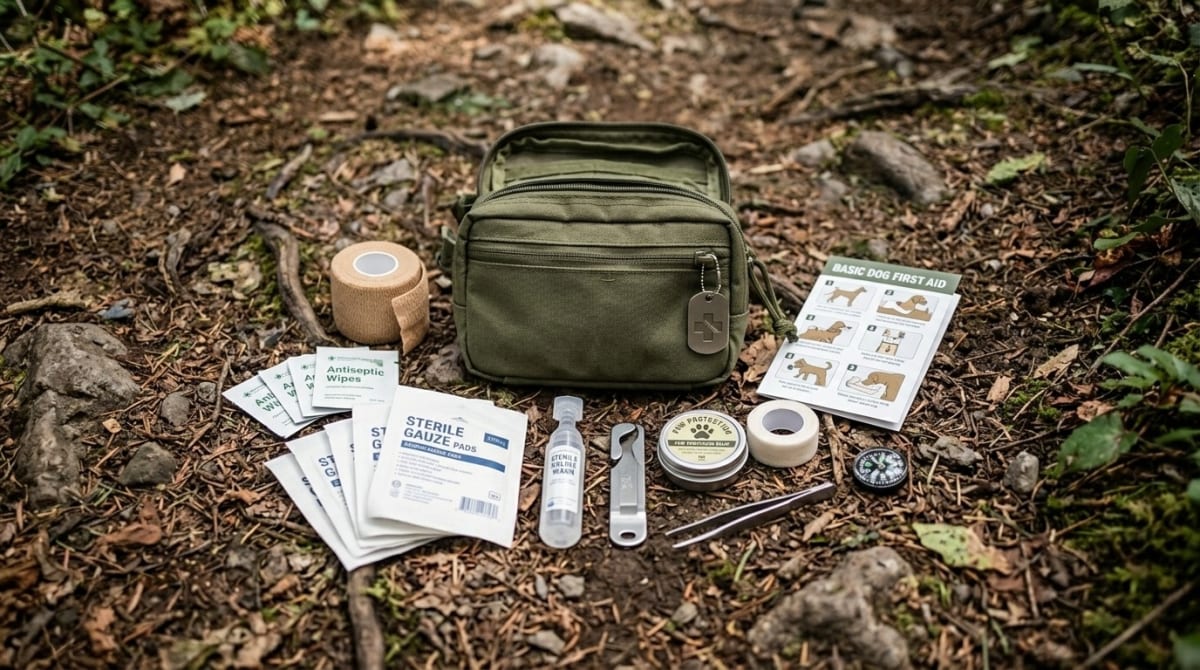
Let's build a DIY dog first aid kit for the trail. It costs under $20. You only need a handful of things from the pharmacy like cohesive vet wrap for two bucks, sterile gauze pads for three, saline wound wash for four, basic tweezers, plain triple antibiotic ointment, and a little bottle of 3% hydrogen peroxide. This barebones setup handles the bulk of common backcountry injuries without the massive dead weight you get from those overstuffed commercial pet kits.
We hike the jagged terrain of the Pacific Northwest. Jasper is a 95-pound German Shepherd. He moves fast. Sometimes he breaks things. Hauling a pre-made medical box never made sense for us because they cost a fortune and just weigh too much when you're grinding through those punishing long elevation gains deep in the Cascades. We pulled trail injury data and ran it against veterinary emergency guidelines to figure out what actually works out there. After putting this exact gear list through the wringer on sharp shale and dense brush trails we threw away everything that sat at the bottom of the bag unused. Overlapping human supplies with the dog's gear drops the base weight right down... usually under eight ounces.
Key Takeaways
- 1A complete trail kit costs under $20 using standard pharmacy supplies - skip the pet aisle markup entirely
- 2Cohesive bandage must be applied loosely - wrapping tight enough to compress blood vessels causes tissue damage
- 3Triple antibiotic ointment must be plain formula only - pramoxine and other topical pain relievers are toxic to dogs
- 4One saline bottle and one pair of tweezers covers both human and dog needs, cutting dead weight from the pack
Affiliate Disclosure: Paths & Paws earns commissions from qualifying purchases made through links on this page. This supports our field testing and does not affect our recommendations. We only recommend gear that passes our trail testing standards. Learn more
The Under-$20 Shopping List
Start at a normal pharmacy. Skip the pet aisle completely. The markup on animal products is ridiculous even though the raw materials are exactly the same as the human equivalents you find two aisles over. We shove all of this into a single quart-sized waterproof bag.
Cohesive Bandage (Generic Vet Wrap) - $2.00
Standard medical tape sticks to dog fur. Removing it pulls the hair out by the root. Cohesive bandages only stick to themselves. A massive German Shepherd paw needs a solid two inches of width to stay wrapped securely over rough ground, but the material cuts down in seconds with a pocket knife for smaller dogs. That makes it incredibly adaptable for any breed. Just buy the cheap athletic wrap they sell near the ankle braces.
Sterile Gauze Pads (4x4 inches) - $3.00
Gauze absorbs blood. Paper towels just dissolve. Grab five or six individual squares. The four-inch squares cover a large paw pad with room to spare. They fold in half easily for tiny punctures.
Saline Eye Wash (Plain) - $4.00
We run a two-ounce bottle of plain saline eye drops because it does double duty on the mountain by flushing trail dust out of an eye or pressure-washing mud out of a fresh cut. Do not buy contact lens solution. Contact fluid has harsh cleaning chemicals that absolutely burn open tissue.
Steel Tweezers - $2.00
Ticks and glass splinters take precision to pull. Borrow a pair from the bathroom cabinet to save some cash. Flimsy plastic tweezers just don't have the bite strength you need to rip embedded cheatgrass out of a dog's toe webbing.
Triple Antibiotic Ointment - $5.00
Read the label closely for a basic antibiotic ointment like store-brand Neosporin. Make sure it contains zero pain relief ingredients. Pramoxine and other common topical anesthetics are highly toxic to dogs when they inevitably lick the spot. We just grab the cheapest generic tube on the shelf.
3% Hydrogen Peroxide - $2.00
We carry a tiny one-ounce travel bottle of 3% hydrogen peroxide. This is our main emergency decontamination tool. A 2012 clinical evaluation published in the Journal of the American Veterinary Medical Association proved that a standard 3% hydrogen peroxide solution safely induces emesis in dogs when administered orally in the field. It helps you recover swallowed toxins before they absorb into the bloodstream. It also bubbles up on contact with blood. That reaction makes it so much easier to hunt down a hidden puncture wound buried under a thick double coat.
Human First Aid Overlap (Weight Savings)
Weight matters out there. Every single ounce counts. Carrying two completely separate medical kits adds stupid amounts of weight. The smartest move combines the human kit with the dog kit while stripping away anything redundant.
Shared Tools and Hardware
Tweezers and trauma shears cross over perfectly. Pack one single pair of shears. We keep ours shoved in the brain of the backpack for quick access. The saline wash cleans up human scrapes just as well as canine cuts. That alone eliminates the need for carrying dried-out alcohol wipes.
Shared Medications
Diphenhydramine works for both of us. We stash generic 25mg Benadryl tablets. For hikers it calms allergic reactions. For dogs it buys crucial time if they take a wasp sting right to the face. The standard veterinary dosage sits around one milligram per pound of body weight, which means a large breed dog demands a much higher pill count than a grown adult just to stop the swelling. Jasper weighs 95 pounds. He needs three to four tablets for an acute reaction while a human only takes one. Check the precise math with a vet before you head out. Never buy the liquid forms loaded with artificial sweeteners.
What Cannot Cross Over
Painkillers are strictly segregated. Ibuprofen and acetaminophen are incredibly toxic to dogs and trigger fatal organ failure fast. Never share human anti-inflammatory drugs with an animal. We carry a specific dog-approved pain relief compound prescribed by our veterinarian just for Jasper. We lock those pills away in a clearly marked and separate vial.
Step-by-Step Treatment for Common Trail Injuries
Field treatment is all about stabilization. The whole point is to stop the bleeding and get the dog back to the trailhead safely before things get worse. We have patched up several minor bleeds out in the woods using this exact gear.
Treating a Torn Paw Pad
Paw pad lacerations happen constantly on loose rocky terrain. Jasper sliced his carpal pad wide open on sharp volcanic rock near Mount Adams a few years back. Paw pads pack dense capillary beds. They bleed like crazy.
- Squirt the saline wash straight into the cut to blast out the dirt.
- Take a gauze pad and press it hard against the cut for three full minutes. Do not peek.
- Smear a thin layer of plain triple antibiotic ointment onto a fresh pad and lay it over the wound.
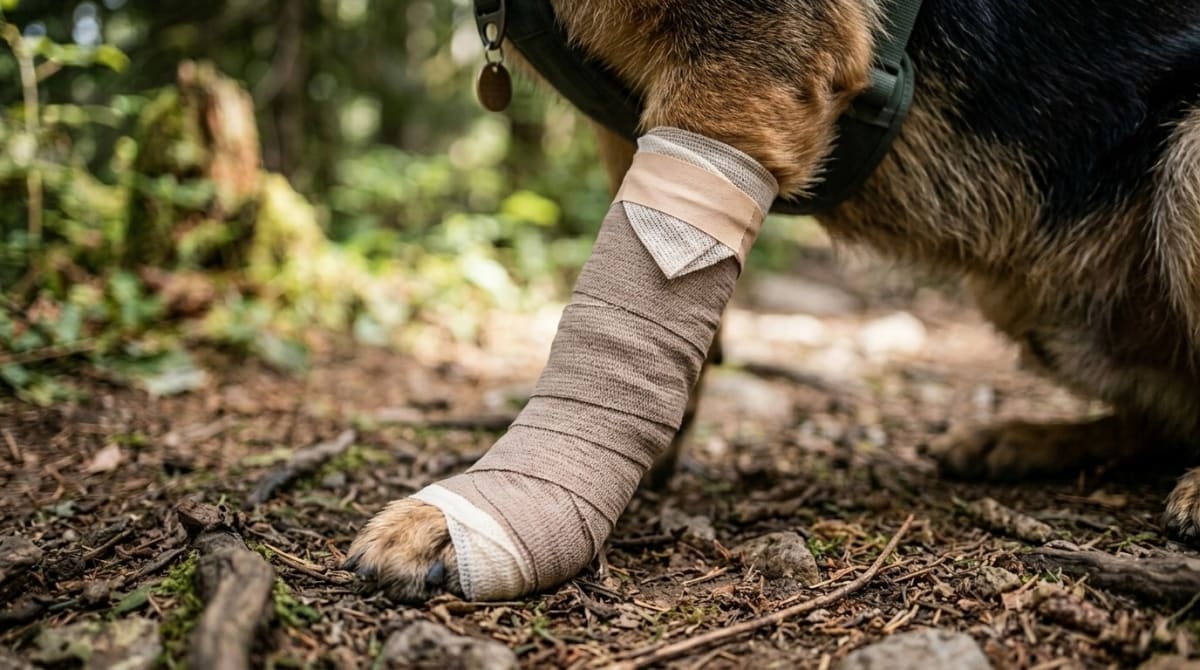
- Start at the bottom of the paw and wrap tightly upward past the wrist joint. Failing to anchor above the joint means the whole bandage slides off in about ten steps, which leaves an open injury completely exposed to trail dirt for the entire hike back to the car.
- Tape the top edge of the wrap straight to the dog's fur using athletic tape.
Managing a Torn Dewclaw
Dogs constantly snag their dewclaws on hidden roots. The nail bed bleeds fast. It looks completely terrifying.
- Leave a hanging nail alone. Do not yank it.
- Wrap a gauze pad right around the nail and squeeze tight.
- Wrap the entire foot up with cohesive bandage. Press the broken nail flat against the leg to stop it from snagging on anything else.
- Keep the dog on a short leash and physically block them from licking the foot until you hit the parking lot.
Removing Ticks and Splinters
Do not burn ticks with matches. Do not drown them in oil.
- Part the fur flat against the skin.
- Take the tweezers and grab the tick exactly where the mouthparts sink into the skin.
- Pull straight up with steady and even pressure.
- Dab a tiny speck of antibiotic ointment directly on the bite mark.
Flushing Debris from the Eye
Busting through heavy brush kicks seeds straight into a dog's eyes.
- Hold the dog's muzzle securely.
- Use a thumb and index finger to pry the lids apart.
- Squeeze a steady stream of saline wash right across the eyeball. The fluid naturally washes the grit out the corner of the eye.
Common Mistakes with Dog First Aid Kits
People pack useless junk. Paws need to drain. We keep seeing hikers make brutal errors out there that turn a minor scrape into a serious emergency.
Creating a Tourniquet Effect
Cohesive bandages stretch. Stretching them tightly around a dog's leg physically compresses the blood vessels, which cuts off circulation entirely and potentially triggers irreversible tissue death within just a few hours if you aren't paying attention. Never pull the bandage tight while you apply it. Unroll three inches of the material first. Let it relax. Lay it gently around the limb. The wrap needs to be snug enough to hold on, but loose enough that you can easily slip a finger underneath.
Applying Ointment on Deep Punctures
Triple antibiotic ointment belongs on shallow surface scrapes. It has absolutely no business inside open puncture wounds from branch spikes or animal teeth. Ointment physically seals the top of a puncture. This sets up the perfect oxygen-free environment for a massive abscess to form. Flush those deep holes with saline and leave them wide open to drain.
Using Liquid Bandages or Super Glue
Do not glue paw pads together. Sealing a filthy trail wound with cyanoacrylate traps bacteria deep inside the tissue. That basically guarantees a severe infection. Paws need to drain and breathe naturally. Stick to gauze and wrap, then let a professional veterinarian clean and close the wound properly back in a sterile clinic.
Packing Heavy Plastic Cases
Pre-made kits ship in rigid plastic boxes that refuse to compress. They chew up unnecessary volume in the pack. Throw the hard box in the recycling. Transfer the core items into a tough waterproof bag. This conforms to the weird empty spaces in a backpack and leaves you more room for extra water.
Ignoring Weight-Based Dosing
Packing hydrogen peroxide to trigger vomiting requires knowing the dog's exact weight, because guessing the required liquid volume while you are panicking on the side of a mountain is an incredibly dangerous game. The formula is one teaspoon per five pounds of body weight. The absolute hard maximum dose sits at three tablespoons. For a 95-pound dog like Jasper we hit that limit immediately. Measure the exact emergency dose into a small travel bottle before leaving the kitchen.
Frequently Asked Questions
Kelly brings an engineering mindset to dog hiking gear. After thousands of miles with Jasper testing every harness, pack, and boot on the market, he knows what holds up and what fails.